
偶尔会遇到PM提的需求,要加入滑动验证,但是不想使用付费的第三方验证,想就在前端实现滑块验证即可(zuò zuò yàng zi),
这一段时间遇到两次要求加滑动验证了,就整理一下构思和部分伪代码逻辑。
本例只是一个面子工程,不会牵扯到复杂的人机验证部分,所以如果需要考虑人机校验,还是推荐你选择靠谱的第三方行为验证,不要自己瞎折腾。
主要使用的是 mousedown, mouseup 和 mousemove 这三个事件的事件绑定。
如果考虑移动端需要使用 touchstart,touchend 和 touchmove 这三个事件,需要根据设备选择绑定的事件。
目前的项目只考虑桌面设备所以直接就省去判断设备这个步骤。
先简单预览一下: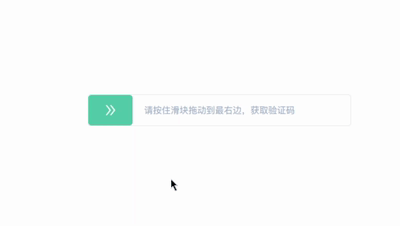
布局及样式
好,首先拆分元素,整体可以拆分为两个部分:1. 滑动验证的容器 和 2. 滑块两个部分
容器部分可以继续拆分为 i. 外部容器 和 ii. 内部的文字 两块。
所以布局方面可以这样来写
<div class="slider-captcha">
  <div class="slider">
    <i class="double-right" />
  </div>
  <div class="msg">请按住滑块拖动到最右边,获取验证码</div>
</div>
先简单实现样式
.slider-captcha{
  width: 400px;
  height: 50px;
  border: 1px solid #ECEBED;
  border-radius: 5px;
  position: relative;
}
.slider{
  width: 60px;
  height: @height;
  line-height: @height;
  text-align: center;
  font-size: 20px;
  color: white;
  background: #55CEA7;
  border-radius: 5px;
  position: absolute;
  left: 0; /* 因为滑块是第一个子元素所以 top 可以省略不写 */
  z-index: 2;
  cursor: pointer;
  box-sizing: border-box;
}
.msg{
  height: @height;
  line-height: @height;
  text-align: center;
  font-size: 13px;
  color: #A1ACC6;
  pointer-events: none;
  user-select: none;
  box-sizing: border-box;
}
完成预览:
接下来我会使用到 VueJS,希望你有使用 Vue。
如果你没有使用过 Vue,直接看methods里边的函数也可以
先把 HTML 模板改成 Vue 模板
<template>
  <div class="slider-captcha" ref="container">
    <div :class="['slider', success&&'success']" ref="slider" :style="{left: `${vX}px`}">
      <a-icon type="double-right" v-if="!success" />
    </div>
    <div :class="['msg', success&&'success']">
      {{ msg }}
    </div>
  </div>
</template>
<script>
export default {
  name: 'slider-captcha',
  data() {
    return {
      vX: 0,
      maxX: 0,
      msg:'请按住滑块拖动到最右边,获取验证码',
      success: false,
      moveing: false
    }
  }
}
</script>
<style lang="stylus" scoped>
$green = #55CEA7
.slider-captcha
  width 100%
  height 50px
  border 1px solid #ECEBED
  border-radius 5px
  position relative
  .msg
    height 100%
    color #A1ACC6
    display flex
    justify-content center
    align-items center
    transition color 1s ease
    pointer-events none
    user-select none
    box-sizing border-box
    &.success
      color white
      background $green
  .slider
    width 60px
    height 100%
    font-size 20px
    color white
    text-align center
    background $green
    border-radius 5px
    display flex
    position absolute
    left 0
    z-index 2
    cursor pointer
    transition background 1s ease
    box-sizing border-box
    &.success
      display none
</style>
简单滑动逻辑
这个时候就要用到 mousedown 和 mousemove 两个事件的绑定,
最后才用到 mouseup 事件。
有点忙, 看啥时候有空再补完,还需要调整一下排版